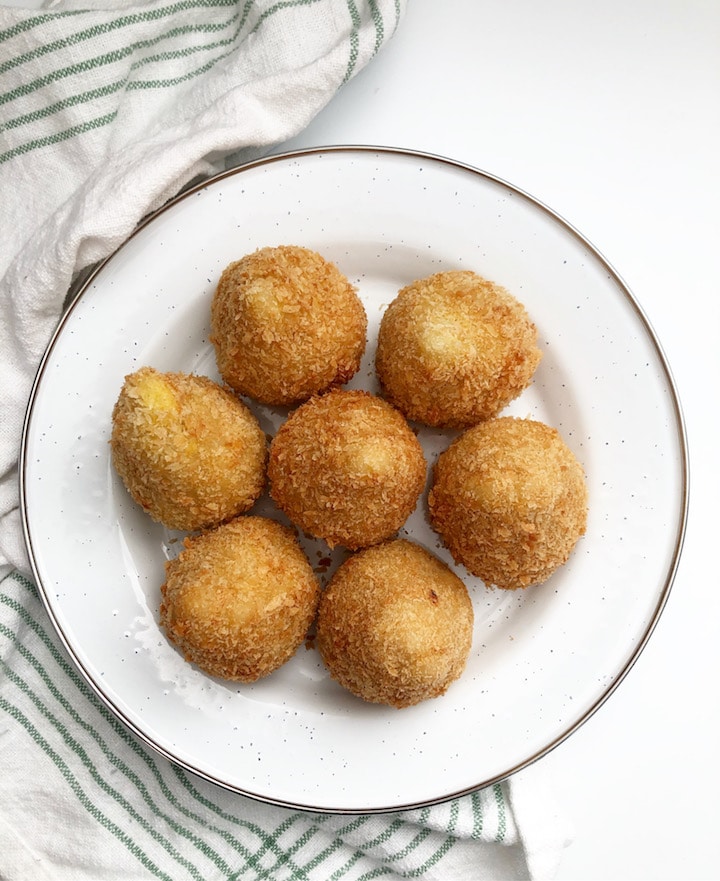
Coxinha are Brazilian chicken croquettes that are stuffed with a flavorful chicken mixture coated in bread crumbs and deep fried. They are crispy on the outside and filled with a flavorful creamy chicken filling.

This Brazilian coxinha recipe is one of my all time favorites. I love serving them at a South American themed dinner party or Brazilian BBQ. They are so full of flavor and are great for a side dish or appetizer.
Last month some of my friends and I threw an amazing Brazilian feast for our husbands who all served a church service mission for two years in Brazil. We wanted to go all out and make some of their favorite dishes that they enjoyed on their missions.
Our menu consisted of feijoada, rice, pao de queijo, picanha, sausages, bacon wrapped chicken, Brazilian potato salad, and these delicious coxinha. We topped it off with my amazing Brazilian limeade, Brigadeiro inspired cake with dulce de leche, a Brazilian flan and grilled cinnamon brown sugar pineapple.
It was all amazing and the men felt like they were back in Brazil. Make these coxinha the next time you want to be swept away to Brazil for a night!
What Are Coxinha?
Coxinha de frango are commonly served on the streets of Brazilian as a quick and easy street food. They are similar to a croquette and stuffed with a creamy chicken mixture.
Typically coxinha are stuffed with a shredded chicken, but can be stuffed with other fillings as well. The dough is formed into a pyramid or teardrop shape which is then coated in egg and bread crumbs.
They are deep fried and become crispy on the outside and full of delicious filling in the middle.
Ingredients:
Rotisserie Chicken: Typically this recipe is made with chicken thighs, chicken drumsticks, chicken legs or other whole pieces of chicken cooked in chicken broth or stock. I find it equally as flavorful and delicious with rotisserie chicken. It’s so much more convenient and quicker to make with the rotisserie chicken.
Cream Cheese: Cream cheese makes the filling rich and creamy.
Onion: I use white onion, but you could also use brown or yellow onion.
Garlic: This aromatic adds so much delicious flavor. I like to use fresh chopped garlic or the frozen minced garlic for this recipe.
Red Bell Pepper: You could also use yellow or orange bell pepper.
Olive Oil: You could use any oil of your choice. This is for sautéing the onion, garlic and red bell pepper.
Salt and Pepper: I love Redmonds Real Salt for cooking. This salt is packed with minerals and is a healthier option than table salt.
Chicken Stock: You can also use a chicken broth. Use a good quality stock or broth as it will add a lot of flavor to the dough.
All Purpose Flour: I haven’t tried this with any other flour, but you could possibly use a gluten free 1-1 flour if needed.
Butter: The little butter in the dough adds a delicious silkiness.
Egg: We will be dipping the dough shaped teardrops into egg and then in panko bread crumbs to create a nice crust on the exterior. The egg helps the bread crumbs adhere to the dough.
Panko Bread Crumbs: Traditionally this recipe is made with fine bread crumbs, but I prefer panko bread crumbs for this dish. Panko bread crumbs are Japanese style breadcrumbs and are coarser. They add a delicious crunch to the exterior of the coxinha.
Oil: You will need enough oil to cover the coxhina while cooking. I like to use a smaller saucepan and cook them in batches so I minimize the amount of oil I need for frying. Vegetable oil works great.
How To Make Coxinha:
First start by making the filling. Typically you would cook whole chicken in chicken broth to make the filling, but I find that a store bought rotisserie chicken works great and gives these little croquettes even more of a flavor boost.
I start by sautéing onion, garlic and red bell pepper until soft and translucent.
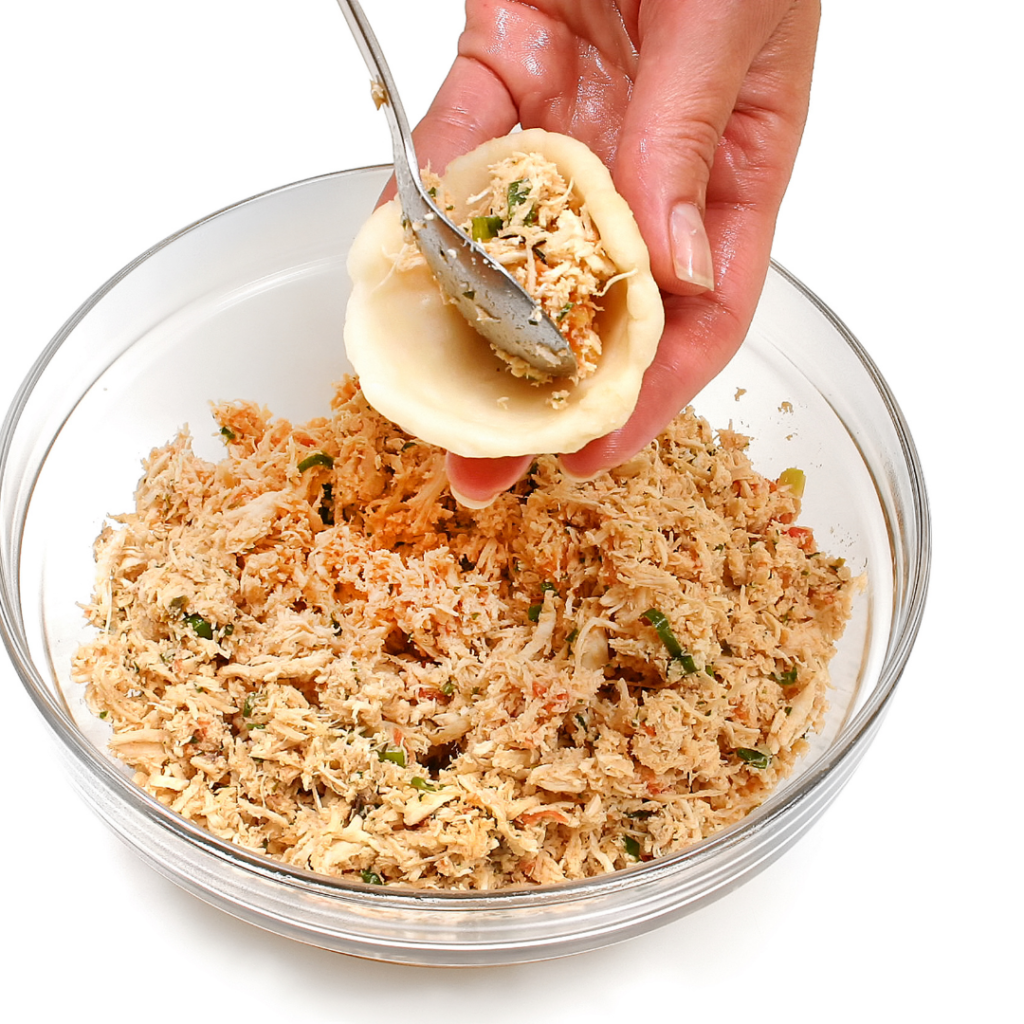
Then combine the shredded rotisserie chicken with cream cheese, lime and add the onion mixture.
Stir to combine and set aside.
Next make the dough by bringing chicken broth or stock up to a simmer with a little butter and salt.
Add the flour and stir vigorously until it becomes a cohesive dough. You can knead the dough slightly if it is too sticky. Let the dough cool.
Grab about 1/4 cup of the dough and flatten to form a disk. Add about 1 tablespoon of the chicken filling to the center. Form the dough over the filling to seal it completely. Shape the dough in a tear drop shape.
Coat the coxinha in eggs and then in panko bread crumbs.
Preheat the cooking oil over medium heat in a small saucepan.
Fry the croquettes in the oil making sure the oil covers the coxinhas. Reduce the heat if needed.
When they are golden brown remove them from the oil and place on paper towels to drain the excess grease. Season with salt.
Can you Freeze Coxinha?
You can freeze these coxinha un-fried on a parchment lined baking dish for 4 hours. Then transfer the frozen coxinha to a freezer gallon ziplock bag and store in the freezer for up to 3 months.
When you are ready to cook them, fry in oil straight from the freezer. Make sure to keep an eye on them to ensure that the outsides don’t burn.
If they are getting too brown on the outside you can lower the temperature of the oil.
What To Serve With Coxinha?
These go well with so many different dishes. If you want to have more of a traditional meal stick with these choices:
Pao de queijo (Brazilian cheese bread)
Brigadeiro Chocolate Bundt Cake With Dulce De Leche
But honestly you can make these fried coxinhas as your main dish and have simple side salad to round out the meal.
Step By Step Coxinha Recipe Video:
Coxinha Recipe:

Coxinha
This delicious Brazilian croquette is stuffed with a creamy and flavorful chicken mixture. It's perfect for an appetizer or serve it as a main dish with a side salad.
Ingredients
- 1/2 cup red bell pepper, small diced
- 1/4 cup white onion, small diced
- 1 teaspoon olive oil
- 3 cloves garlic, minced
- 2 cups rotisserie chicken, shredded
- 4 ounces cream cheese, softened
- 1 lime, juiced
- 1 teaspoon salt
For The Dough:
- 4 cups chicken broth or stock
- 2 tablespoons butter
- 4 cups all purpose flour
- 2 teaspoons salt
- 4 eggs, whisked
- 2 cups panko bread crumbs
- cooking oil for frying
Instructions
- Dice the red pepper into a small dice.
- Dice the onion into a small dice.
- Preheat a saute pan over medium heat. Add the olive oil and garlic. Saute for 1 minute.
- Then add the onion and bell pepper and saute for 3 minutes.
- Add the rotisserie chicken to a mixing bowl.
- Then add the softened cream cheese, lime juice, sauteed onion, garlic and bell pepper.
- Add the salt and mix to fully combine.
- Add the chicken stock or broth to a saucepan. Then add the butter and bring to a simmer over medium high heat on the stove.
- Measure out the flour and salt in a separate bowl.
- Turn the stove off and vigorously stir in the flour mixture to the chicken stock until well combined.
- Turn the stove back on to medium heat and cook for 1 minute while stirring. Then remove immediately. Let cool for 10-15 minutes.
- Flour your hands. Grab a small amount of dough and roll into a ball. Flatten to a dish and fill with 1 tablespoon filling. Pinch the sides together and form a teardrop.
- Repeat with the remaining dough and filling.
- Set up your dredging station with the egg and panko. Add the eggs into a bowl and scramble with a whisk.
- Place the panko into a shallow dish.
- Dredge the coxinha into the egg mixture and then into the panko and set on a baking sheet. Continue with the remaining coxinha.
- Fill a small saucepan with vegetable oil 1/2 way up. Turn on medium heat. When the oil is hot but not smoking (360 F) fry the coxhina.
- Fry until golden brown and then remove them to a paper towel lined baking sheet. Season with salt. Enjoy warm.
Nutrition Information:
Yield:
12Serving Size:
1Amount Per Serving: Calories: 397Total Fat: 13gSaturated Fat: 5gTrans Fat: 0gUnsaturated Fat: 7gCholesterol: 115mgSodium: 1198mgCarbohydrates: 48gFiber: 2gSugar: 3gProtein: 21g